Motorcycle Tire Removal and Replacement
Posted by Team Motorcycle on Aug 23rd 2016
|
|
|
|
|
|
| Motorcycle tires may seem relatively unimportant and simple when held up next to a component as complex as an engine, but all of the extensive engineering of a motorcycle ultimately comes down to where the rubber meets the road. While tires do require some maintenance in the way of checking pressure and the occasional topping off of air, they are unfortunately often neglected for far too long. There are numerous wear and safety issues that can come about from long-term inattentiveness to their condition. One common yet dangerous condition is the "dry-rotting" or cracking of old tires. While they may still have plenty of tread left, tires that exhibit cracking on the sidewall or tread should be discarded and replaced immediately. Another way that riders tend to push tires beyond their safe limits is by running them bald or even down to the belts. Not only is the possibility of a blowout substantially increased, but without grooves in the tire's tread to disperse water the risk of hydroplaning increases as well. | ||||
|
|
|
|
|
|
|
|
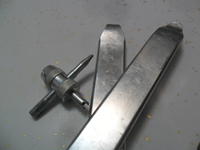
Whatever the case or condition of your tire, when it comes time to replace the rubber on your bike you should know that you don't necessarily need to take it to an expensive motorcycle shop to get the job done. In fact, for the price of replacing one tire you can likely buy the tools needed to do the job yourself indefinitely! Before you get started removing the tire from the wheel you'll need to remove the wheel from your bike. Once it's off you only need a couple of simple but specialized tools to properly remove the tire from the wheel itself. One is | |||
| called a "valve stem removal tool." It can be found at most auto parts stores for just a few dollars and it will enable you to remove the one-way valve that keeps air inside the tire for easy deflation. You'll also need a simple tool called a tire iron to pry the tire off of the wheel. Two of them are required and for an easier swap it helps to buy a pair that are on the long side. Some are available with gently hooked ends that can make it easier to get the iron under the tire's edge while you're working. Having a third iron to hold things in place can also be helpful but isn't necessary. Some find that having a lubricant helps the tire to slip onto the wheel more easily during reinstallation. Rubbing alcohol, beeswax and window cleaner has worked for many riders though there are purpose-made compounds that can be bought from specialty shops as well. Lubricant isn't always necessary but can be good to have around if you get in a bind. | ||||
|
|
|
|
|
|
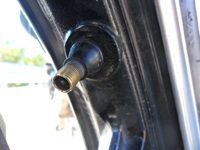
| If you've got what you need to begin, it's time to get your hands dirty! I'm going to assume you've used your repair manual to get the wheel off the bike properly and that it's sitting in front of you. Use the valve stem removal tool to unscrew the check valve from the tire's stem and put it somewhere safe. Now that the internal and external pressures are equalized you can work the flat side of your first iron between the wheel and the tire itself. Pry the tire away from the edge of the wheel to break the "bead" or airtight seal. If you hear cracking or squeaking |
|
|||
| sounds you're making progress. You will likely need to work back and forth across an area a couple of times or more before it pops off the edge. When you're finished on one side, flip it over and move onto the opposing side. With both sides of the bead broken, the tire should now slide around freely on the wheel. All you need to do now is pry the edges of the tire over the outside of the wheel using the irons, working outward in both directions across the circumference of the wheel until you have the tire off. It can require a bit of strength in the beginning and get easier as you go. Put the old tire aside and dispose of it properly if it's in bad shape. | ||||
|
|
|
|
|
|
|
|
|
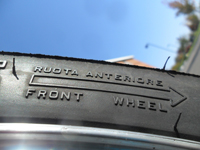
Before beginning installation of the new tire take care to note its direction as most tires can only be mounted one way. You should be able to find an arrow that tells you on the tire itself. Reinstalling a tire is easy at the beginning but gets more difficult as you go. Work the iron under both edges of the tire and then pry it up over the outer edge of the wheel. With the first iron still in place, pry under another section of the tire a few inches away from your first and pop a bit more of the tire over the lip. Repeat this process until you have the tire on. By the last bit | ||
| you may be stretching the tire quite drastically, but this is normal. Use a small amount of tire lube if there's trouble getting the last bit over the edge | ||||
|
|
|
|
|
|
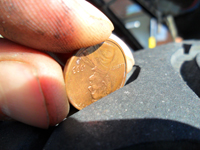
| Most tires have a marking on them that indicates it's lightest point. Before inflating, line that mark up with the valve stem, which is the heaviest part of the wheel. This helps to ensure proper balance. Reinstall the valve core with your special tool. Once the tire is fully inflated and the bead set, fine tuning the balance can be done with the wheel on its axle situated horizontally on two jack stands. If there is a heavy spot, gravity will spin the wheel until it's at the bottom. Adhesive-backed wheel weights can be applied to the opposite end so that there |
|
|
||
| are no heavy spots when the wheel is spun. Reinstall the wheel once you're satisfied, double-check the tire's pressure, and take it for a ride. Congratulations, you've just saved yourself a bundle of money and can sleep soundly at night with the satisfaction that you've done the job right. | ||||
|
|
|
|
|
|